|
|
Kierunek
Informatyka
|
|||
|
|
||||
Instrukcja do ćwiczeń
laboratoryjnych nr:
|
14
|
Nazwa przedmiotu:
|
||
Temat: Fragmenty,
ViewModel
|
Tryb studiów:
stacjonarne |
|||
|
Czas
trwanie ćw. 2x45
min |
||||
|
Autor materiałów:
dr Marcin Skuba |
||||

1.
Treści programowe:
Fragmenty,
przekazywanie danych pomiędzy fragmentami.
2. Cel
zajęć:
Celem
zajęć jest opanowanie umiejętności tworzenia interfejsu użytkownika z
wykorzystaniem fragmentów.
3.
Materiały dydaktyczne
Fragmenty (Fragments) w
Android Studio: najważniejsze cechy:
- Fragment to część interfejsu użytkownika w Activity
(taki „mini-ekran”).
- Pozwala dzielić UI na moduły i
łatwo je wymieniać (np. w tabletach, ViewPager, Navigation).
- Fragment zawsze działa wewnątrz
Activity – sam nie istnieje.
- Ma własny cykl życia, ale zależny
od cyklu życia Activity.
- UI fragmentu definiujesz w osobnym
pliku XML.
- Fragmenty można dynamicznie dodawać,
usuwać i zastępować (FragmentManager).
- Ułatwiają wielokrotne użycie kodu
i czytelniejszą architekturę aplikacji.
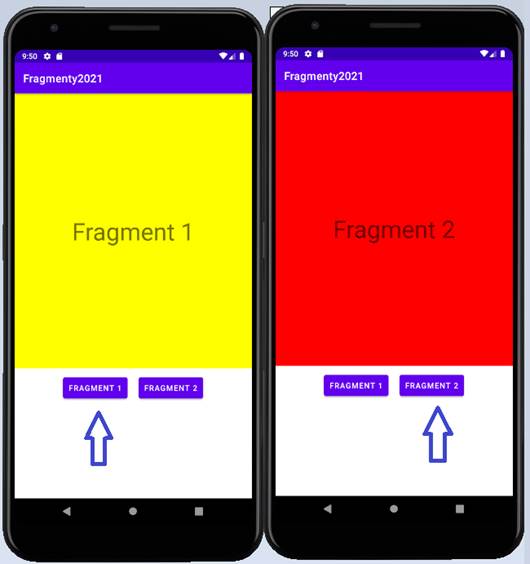
Przykład
1
Przykład
ukazujący sposób wyświetlania i zamiany fragmentów w aktywności.
--------------------------------------------------------------------------------------------------------------------------
Plik
„activity_main.xml”
<?xml version="1.0" encoding="utf-8"?>
<RelativeLayout xmlns:android="http://schemas.android.com/apk/res/android"
xmlns:app="http://schemas.android.com/apk/res-auto"
xmlns:tools="http://schemas.android.com/tools"
android:layout_width="match_parent"
android:layout_height="match_parent"
android:orientation="vertical"
tools:context=".MainActivity">
<FrameLayout
android:id="@+id/frame_layout"
android:layout_width="match_parent"
android:layout_height="500dp"
android:layout_margin="10dp"
/>
<LinearLayout
android:layout_width="match_parent"
android:layout_height="wrap_content"
android:orientation="horizontal"
android:layout_below="@+id/frame_layout"
android:gravity="center">
<Button
android:id="@+id/button1"
android:layout_width="wrap_content"
android:layout_height="wrap_content"
android:text="Fragment 1"
android:layout_margin="10dp"
android:padding="10dp" />
<Button
android:id="@+id/button2"
android:layout_width="wrap_content"
android:layout_height="wrap_content"
android:padding="10dp"
android:layout_margin="10dp"
android:text="Fragment 2" />
</LinearLayout>
</RelativeLayout>
Plik
”MainActivity.java”
import androidx.appcompat.app.AppCompatActivity;
import androidx.fragment.app.Fragment;
import androidx.fragment.app.FragmentManager;
import androidx.fragment.app.FragmentTransaction;
import android.os.Bundle;
import android.view.View;
import android.widget.Button;
public class MainActivity extends AppCompatActivity {
@Override
protected void
onCreate(Bundle savedInstanceState) {
super.onCreate(savedInstanceState);
setContentView(R.layout.activity_main);
getSupportFragmentManager().beginTransaction().add(R.id.frame_layout, new Fragment1()).commit();
Button button1 = findViewById(R.id.button1);
button1.setOnClickListener(new View.OnClickListener() {
@Override
public void onClick(View
v) {
replaceFragment(new Fragment1());
}
});
Button button2 = findViewById(R.id.button2);
button2.setOnClickListener(new View.OnClickListener() {
@Override
public void onClick(View
v) {
replaceFragment(new Fragment2());
}
});
}
private void
replaceFragment(Fragment fragment){
FragmentManager
fragmentManager = getSupportFragmentManager();
FragmentTransaction
fragmentTransaction = fragmentManager.beginTransaction();
fragmentTransaction.replace(R.id.frame_layout,
fragment);
fragmentTransaction.commit();
}
}
1.
getSupportFragmentManager() To wywołanie menedżera,
który zarządza fragmentami w Twojej aktywności (Activity). Wersja "Support" zapewnia kompatybilność ze starszymi wersjami
systemu Android.
2.
.beginTransaction()
Operacje
na fragmentach (dodawanie, usuwanie, zamiana) muszą odbywać się w ramach tzw. transakcji.
3.
.add(R.id.frame_layout, new Fragment1()) To jest serce operacji. Metoda add
przyjmuje dwa parametry:
4.
R.id.frame_layout: To ID kontenera (zazwyczaj
FrameLayout w pliku XML), w którym ma się pojawić
fragment.
5.
new
Fragment1(): To
instancja klasy Twojego fragmentu, który chcesz wyświetlić.
6.
.commit() To ostateczne zatwierdzenie. Bez tej metody nic
się nie stanie. Mówi ona systemowi: "Wszystkie powyższe instrukcje są
gotowe, wykonaj je teraz".
Jeśli
chcesz zmienić jeden fragment na drugi (np. po kliknięciu w menu), zamiast .add()
lepiej
użyć metody .replace().
Dzięki
temu nowy fragment zastąpi stary, zamiast nakładać się jeden na drugi.
Plik
„fragment_1.xml”
<?xml version="1.0" encoding="utf-8"?>
<FrameLayout xmlns:android="http://schemas.android.com/apk/res/android"
xmlns:tools="http://schemas.android.com/tools"
android:layout_width="match_parent"
android:layout_height="match_parent"
tools:context=".Fragment1">
<TextView
android:layout_width="match_parent"
android:layout_height="match_parent"
android:text="Fragment 1"
android:textSize="44dp"
android:gravity="center"
android:background="#ff0"/>
</FrameLayout>
Plik
„fragment_2.xml”
<?xml version="1.0" encoding="utf-8"?>
<FrameLayout xmlns:android="http://schemas.android.com/apk/res/android"
xmlns:tools="http://schemas.android.com/tools"
android:layout_width="match_parent"
android:layout_height="match_parent"
tools:context=".Fragment2">
<TextView
android:layout_width="match_parent"
android:layout_height="match_parent"
android:text="Fragment 2"
android:textSize="44dp"
android:gravity="center"
android:background="#f00"/>
</FrameLayout>
Plik
„Fragment1.java”
import android.os.Bundle;
import androidx.fragment.app.Fragment;
import android.view.LayoutInflater;
import android.view.View;
import android.view.ViewGroup;
public class Fragment1 extends Fragment {
public Fragment1() {
//
Required empty public constructor
}
@Override
public void onCreate(Bundle savedInstanceState) {
super.onCreate(savedInstanceState);
}
@Override
public View onCreateView(LayoutInflater inflater, ViewGroup container,
Bundle savedInstanceState) {
//
Inflate the layout for this
fragment
return
inflater.inflate(R.layout.fragment_1, container, false);
}
}
Plik
„Fragment2.java”
import android.os.Bundle;
import androidx.fragment.app.Fragment;
import android.view.LayoutInflater;
import android.view.View;
import android.view.ViewGroup;
public class Fragment2 extends Fragment {
public Fragment2() {
//
Required empty public constructor
}
@Override
public void onCreate(Bundle savedInstanceState) {
super.onCreate(savedInstanceState);
}
@Override
public View onCreateView(LayoutInflater inflater, ViewGroup container,
Bundle savedInstanceState) {
//
Inflate the layout for this
fragment
return
inflater.inflate(R.layout.fragment_2, container, false);
}
}
Metoda
wywoływana po utworzeniu widoku
@Override
public void onViewCreated(@NonNull View view, @Nullable
Bundle savedInstanceState)
{
super.onViewCreated(view, savedInstanceState);
TextView textView;
textView =
(TextView) getView().findViewById(R.id.textView);
Executor executor = Executors.newSingleThreadExecutor();
Handler handler
= new Handler(Looper.getMainLooper());
executor.execute(new Runnable() {
@Override
public
void run() {
int licznik=0;
while (true) {
int finalLicznik = licznik;
handler.post(new Runnable() {
@Override
public void run() {
textView.setText(""+ finalLicznik);
}
});
licznik++;
try {
Thread.sleep(1000);
} catch (InterruptedException e) {
throw new RuntimeException(e);
}
}
}
});
}
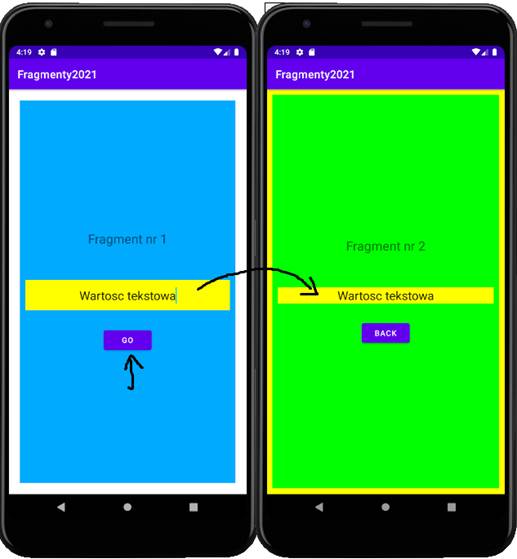
Przykład
2
Przykład
ukazujący sposób przekazywania danych między fragmentami w trakcie tworzenia
nowego fragmentu (jeden fragment w widoku)
----------------------------------------------------------------
Plik
„MainActivity.java”
import androidx.appcompat.app.AppCompatActivity;
import android.os.Bundle;
public class MainActivity extends AppCompatActivity {
@Override
protected void
onCreate(Bundle savedInstanceState) {
super.onCreate(savedInstanceState);
setContentView(R.layout.activity_main);
getSupportFragmentManager().beginTransaction().add(R.id.frame_layout, new Fragment1()).commit();
}
}
Plik
„activity_main.java”
<?xml version="1.0" encoding="utf-8"?>
<RelativeLayout xmlns:android="http://schemas.android.com/apk/res/android"
xmlns:tools="http://schemas.android.com/tools"
android:layout_width="match_parent"
android:layout_height="match_parent"
android:orientation="vertical"
tools:context=".MainActivity">
<FrameLayout
android:id="@+id/frame_layout"
android:layout_width="match_parent"
android:layout_height="match_parent"
>
</FrameLayout>
</RelativeLayout>
Plik
„fragment_1.xml”
<?xml version="1.0" encoding="utf-8"?>
<FrameLayout xmlns:android="http://schemas.android.com/apk/res/android"
xmlns:tools="http://schemas.android.com/tools"
android:layout_width="match_parent"
android:layout_height="match_parent"
android:padding="20dp"
tools:context=".Fragment1">
<LinearLayout
android:layout_width="match_parent"
android:layout_height="match_parent"
android:orientation="vertical"
android:background="#0af"
android:gravity="center">
<TextView
android:layout_width="match_parent"
android:layout_height="wrap_content"
android:text="Fragment nr 1"
android:textSize="23dp"
android:gravity="center"
android:layout_marginBottom="50dp"/>
<EditText
android:id="@+id/edit_text"
android:layout_width="match_parent"
android:layout_height="wrap_content"
android:textSize="22dp"
android:gravity="center"
android:layout_margin="10dp"
android:hint="podaj wartosc parametru dla
fragmentu nr 2"
android:background="#ff0"/>
<Button
android:id="@+id/button_go"
android:layout_width="wrap_content"
android:layout_height="wrap_content"
android:layout_marginTop="20dp"
android:layout_gravity="center"
android:text="Go"/>
</LinearLayout>
</FrameLayout>
Plik
„fragment_2.xml”
<?xml version="1.0" encoding="utf-8"?>
<FrameLayout xmlns:android="http://schemas.android.com/apk/res/android"
xmlns:tools="http://schemas.android.com/tools"
android:layout_width="match_parent"
android:layout_height="match_parent"
android:background="#ff0"
android:padding="10dp"
tools:context=".Fragment2">
<LinearLayout
android:layout_width="match_parent"
android:layout_height="match_parent"
android:orientation="vertical"
android:background="#0f0"
android:gravity="center">
<TextView
android:layout_width="match_parent"
android:layout_height="wrap_content"
android:text="Fragment nr 2"
android:textSize="23dp"
android:gravity="center"
android:layout_marginBottom="50dp"/>
<EditText
android:id="@+id/edit_text"
android:layout_width="match_parent"
android:layout_height="wrap_content"
android:textSize="22dp"
android:gravity="center"
android:layout_margin="10dp"
android:background="#ff0"/>
<Button
android:id="@+id/button_back"
android:layout_width="wrap_content"
android:layout_height="wrap_content"
android:layout_marginTop="20dp"
android:layout_gravity="center"
android:text="Back"/>
</LinearLayout>
</FrameLayout>
Plik
„Fragment1.java”
import android.os.Bundle;
import androidx.fragment.app.Fragment;
import android.view.LayoutInflater;
import android.view.View;
import android.view.ViewGroup;
import android.widget.Button;
import android.widget.EditText;
public class Fragment1 extends Fragment {
Button buttonGo;
EditText editText;
// TODO: Rename parameter
arguments, choose names that match
//
the fragment initialization parameters,
e.g. ARG_ITEM_NUMBER
private static
final String ARG_PARAM1 = "param1";
private static
final String ARG_PARAM2 = "param2";
// TODO: Rename and change
types of parameters
private String mParam1;
private String mParam2;
public Fragment1() {
//
Required empty public constructor
}
// TODO: Rename and change
types and number of parameters
public
static Fragment1
newInstance(String param1, String param2) {
Fragment1 fragment = new Fragment1();
Bundle args
= new Bundle();
args.putString(ARG_PARAM1, param1);
args.putString(ARG_PARAM2, param2);
fragment.setArguments(args);
return
fragment;
}
@Override
public void onCreate(Bundle savedInstanceState) {
super.onCreate(savedInstanceState);
if (getArguments() != null) {
mParam1 = getArguments().getString(ARG_PARAM1);
mParam2 = getArguments().getString(ARG_PARAM2);
}
}
@Override
public View onCreateView(LayoutInflater inflater, ViewGroup container,
Bundle savedInstanceState) {
//
Inflate the layout for this
fragment
View v = inflater.inflate(R.layout.fragment_1, container, false);
editText = (EditText)v.findViewById(R.id.edit_text);
buttonGo = (Button)v.findViewById(R.id.button_go);
buttonGo.setOnClickListener(new View.OnClickListener(){
@Override
public void onClick(View
v) {
///------------- Przykład przesyłania całej paczki bundle do drugiego fragmentu2-------------------
/// Bundle bundle = new Bundle();
/// bundle.putString("KEY_1",
editText.getText().toString());
/// Fragment2 fragment2
= new Fragment2();
/// fragment2.setArguments(bundle);
Fragment2 fragment2 = Fragment2.newInstance(mParam1,editText.getText().toString());
getParentFragmentManager().beginTransaction().replace(R.id.frame_layout, fragment2).commit();
}
});
editText.setText(mParam2);
return
v;
}
}
Plik „Fragment2.java”
import android.os.Bundle;
import androidx.fragment.app.Fragment;
import android.view.LayoutInflater;
import android.view.View;
import android.view.ViewGroup;
import android.widget.Button;
import android.widget.EditText;
/**
* A simple {@link Fragment} subclass.
* Use the {@link Fragment2#newInstance}
factory method to
* create an instance of this fragment.
*
*/
public class Fragment2 extends Fragment {
// TODO: Rename parameter
arguments, choose names that match
//
the fragment initialization parameters,
e.g. ARG_ITEM_NUMBER
private static
final String ARG_PARAM1 = "param1";
private static
final String ARG_PARAM2 = "param2";
// TODO: Rename and change
types of parameters
private String mParam1;
private String mParam2;
/**
* Use this factory method
to create a new instance of
* this
fragment using the provided
parameters.
*
* @param param1 Parameter 1.
* @param param2 Parameter 2.
* @return A new instance of fragment
Fragment2.
*/
//
TODO: Rename and change types and number of parameters
public
static Fragment2
newInstance(String param1, String param2) {
Fragment2 fragment = new Fragment2();
Bundle args
= new Bundle();
args.putString(ARG_PARAM1, param1);
args.putString(ARG_PARAM2, param2);
fragment.setArguments(args);
return
fragment;
}
public Fragment2() {
}
@Override
public void onCreate(Bundle savedInstanceState) {
super.onCreate(savedInstanceState);
if (getArguments() != null) {
mParam1 = getArguments().getString(ARG_PARAM1);
mParam2 = getArguments().getString(ARG_PARAM2);
}
}
@Override
public View onCreateView(LayoutInflater inflater, ViewGroup container, Bundle savedInstanceState) {
View v
= inflater.inflate(R.layout.fragment_2, container, false);
EditText
editText=(EditText)v.findViewById(R.id.edit_text);
Button buttonBack
= (Button)v.findViewById(R.id.button_back);
buttonBack.setOnClickListener(new View.OnClickListener() {
@Override
public void onClick(View
v) {
Fragment1 fragment1 = Fragment1.newInstance("KEY_1",editText.getText().toString());
getParentFragmentManager().beginTransaction().replace(R.id.frame_layout, fragment1).commit();
}
});
///-----------
Przykład odbierania całej praczki z fragmentu 1 ------------------------
/// Bundle bundle
= getArguments();
/// String mParam
= bundle.getString("KEY_1","");
/// editText.setText(mParam);
editText.setText(mParam2);
return
v;
}
}
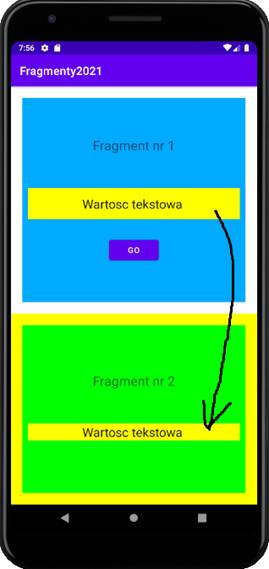
Przykład
3
Przykład
ukazujący sposób przekazywania danych między fragmentami widocznymi w widoku
Plik
„MainActivity.java”
import androidx.appcompat.app.AppCompatActivity;
import android.os.Bundle;
public class MainActivity extends AppCompatActivity {
@Override
protected void
onCreate(Bundle savedInstanceState) {
super.onCreate(savedInstanceState);
setContentView(R.layout.activity_main);
getSupportFragmentManager().beginTransaction().add(R.id.frame_layout1, new Fragment1()).commit();
getSupportFragmentManager().beginTransaction().add(R.id.frame_layout2, new Fragment2()).commit();
}
}
Plik
„activity_main.xml”
<?xml version="1.0" encoding="utf-8"?>
<RelativeLayout xmlns:android="http://schemas.android.com/apk/res/android"
xmlns:app="http://schemas.android.com/apk/res-auto"
xmlns:tools="http://schemas.android.com/tools"
android:layout_width="match_parent"
android:layout_height="match_parent"
android:orientation="vertical"
tools:context=".MainActivity">
<FrameLayout
android:id="@+id/frame_layout1"
android:layout_width="match_parent"
android:layout_height="400dp"
>
</FrameLayout>
<FrameLayout
android:id="@+id/frame_layout2"
android:layout_below="@+id/frame_layout1"
android:layout_width="match_parent"
android:layout_height="400dp"
>
</FrameLayout>
</RelativeLayout>
Plik
„fragment_1.java”
<?xml version="1.0" encoding="utf-8"?>
<FrameLayout xmlns:android="http://schemas.android.com/apk/res/android"
xmlns:tools="http://schemas.android.com/tools"
android:layout_width="match_parent"
android:layout_height="match_parent"
android:padding="20dp"
tools:context=".Fragment1">
<LinearLayout
android:layout_width="match_parent"
android:layout_height="match_parent"
android:orientation="vertical"
android:background="#0af"
android:gravity="center">
<TextView
android:layout_width="match_parent"
android:layout_height="wrap_content"
android:text="Fragment nr 1"
android:textSize="23dp"
android:gravity="center"
android:layout_marginBottom="50dp"/>
<EditText
android:id="@+id/edit_text"
android:layout_width="match_parent"
android:layout_height="wrap_content"
android:textSize="22dp"
android:gravity="center"
android:layout_margin="10dp"
android:hint="podaj wartosc parametru dla
fragmentu nr 2"
android:background="#ff0"/>
<Button
android:id="@+id/button_go"
android:layout_width="wrap_content"
android:layout_height="wrap_content"
android:layout_marginTop="20dp"
android:layout_gravity="center"
android:text="Go"/>
</LinearLayout>
</FrameLayout>
Plik „fragment_2.java”
<?xml version="1.0" encoding="utf-8"?>
<FrameLayout xmlns:android="http://schemas.android.com/apk/res/android"
xmlns:tools="http://schemas.android.com/tools"
android:layout_width="match_parent"
android:layout_height="match_parent"
android:background="#ff0"
android:padding="10dp"
tools:context=".Fragment2">
<LinearLayout
android:layout_width="match_parent"
android:layout_height="match_parent"
android:orientation="vertical"
android:background="#0f0"
android:gravity="center">
<TextView
android:layout_width="match_parent"
android:layout_height="wrap_content"
android:text="Fragment nr 2"
android:textSize="23dp"
android:gravity="center"
android:layout_marginBottom="50dp"/>
<EditText
android:id="@+id/edit_text"
android:layout_width="match_parent"
android:layout_height="wrap_content"
android:textSize="22dp"
android:gravity="center"
android:layout_margin="10dp"
android:background="#ff0"/>
</LinearLayout>
</FrameLayout>
Plik
„Fragment1.java”
import android.os.Bundle;
import androidx.fragment.app.Fragment;
import android.view.LayoutInflater;
import android.view.View;
import android.view.ViewGroup;
import android.widget.Button;
import android.widget.EditText;
public class Fragment1 extends Fragment {
public Fragment1() {
}
// TODO: Rename and change
types and number of parameters
@Override
public void onCreate(Bundle savedInstanceState) {
super.onCreate(savedInstanceState);
}
@Override
public View onCreateView(LayoutInflater inflater, ViewGroup container,
Bundle savedInstanceState)
{
View v
= inflater.inflate(R.layout.fragment_1, container, false);
EditText
editText = v.findViewById(R.id.edit_text);
Button buttonGo
= v.findViewById(R.id.button_go);
buttonGo.setOnClickListener(new View.OnClickListener(){
@Override
public void onClick(View
v) {
Bundle bundle = new Bundle();
bundle.putString("KEY_VALUE_1", editText.getText().toString());
getParentFragmentManager().setFragmentResult("KEY_MESSAGE_1", bundle);
}
});
return
v;
}
}
Plik
„Fragment2.java”
import android.os.Bundle;
import androidx.annotation.NonNull;
import androidx.fragment.app.Fragment;
import androidx.fragment.app.FragmentResultListener;
import android.view.LayoutInflater;
import android.view.View;
import android.view.ViewGroup;
import android.widget.EditText;
public class Fragment2 extends Fragment {
public Fragment2() {
}
@Override
public void onCreate(Bundle savedInstanceState) {
super.onCreate(savedInstanceState);
}
@Override
public View onCreateView(LayoutInflater inflater, ViewGroup container, Bundle savedInstanceState) {
View v
= inflater.inflate(R.layout.fragment_2, container, false);
EditText
editText=v.findViewById(R.id.edit_text);
getParentFragmentManager().setFragmentResultListener("KEY_MESSAGE_1", this, new FragmentResultListener() {
@Override
public void onFragmentResult(@NonNull String requestKey,
@NonNull Bundle result) {
editText.setText(result.getString("KEY_VALUE_1"));
}
});
return
v;
}
}
ViewModel
ViewModel to obecnie standard w Androidzie. Pozwala on
na komunikację między fragmentami bez konieczności ręcznego pakowania danych do
Bundle i bez ryzyka wycieków pamięci.
ViewModel to
jedna z najważniejszych klas wchodzących w skład biblioteki Android Jetpack. Została stworzona, aby rozwiązać dwa główne
problemy: utratę danych przy obracaniu ekranu oraz zbyt skomplikowany kod w
Aktywnościach.
Główną
zaletą jest to, że ViewModel żyje tak długo, jak
długo żyje Activity (czyli "rodzic" Twoich fragmentów). Jeśli
jeden fragment wpisze coś do ViewModel, drugi
fragment może to natychmiast odczytać.
Najważniejsze
cechy ViewModel:
- Odporność na zmiany konfiguracji (np.
obrót ekranu) Standardowe zmienne w Aktywności lub Fragmencie są niszczone
podczas obracania telefonu. ViewModel zostaje w
pamięci tak długo, jak długo trwa sesja danego ekranu. Dzięki temu dane
(np. tekst wpisany w pole, lista pobrana z sieci) nie znikają po zmianie
orientacji ekranu.
- Oddzielenie logiki od interfejsu (Separation of Concerns)
Zgodnie z zasadą czystego kodu, Fragment powinien zajmować się tylko
wyświetlaniem widoków, a ViewModel powinien
trzymać dane i logikę biznesową. Dzięki temu kod jest łatwiejszy w
testowaniu i utrzymaniu.
- Bezpieczna komunikacja między
fragmentami Używając współdzielonego ViewModelu
(shared), fragmenty mogą „rozmawiać” ze sobą bez
bezpośredniego wywoływania swoich metod. Jeden fragment zmienia dane w ViewModelu, a drugi automatycznie to zauważa dzięki
obserwatorom (LiveData).
- Brak wycieków pamięci (Memory Leaks) ViewModel nigdy nie
powinien przechowywać referencji do Context, Activity
ani View. Dzięki temu, nawet jeśli proces tła w ViewModelu trwa dłużej, nie zablokuje on usunięcia
Aktywności z pamięci, co zapobiega zawieszaniu aplikacji.
Implementacja:
1.
Utwórz klasę ViewModel
Ta
klasa będzie przechowywać Twoje dane (np. tekst z EditText).
Plik SharedViewModel.java
import
androidx.lifecycle.MutableLiveData;
import androidx.lifecycle.ViewModel;
public class SharedViewModel extends ViewModel {
// LiveData pozwala fragmentom
"obserwować" zmiany w czasie rzeczywistym
private final
MutableLiveData<String> selectedText = new MutableLiveData<>();
public void setText(String text)
{
selectedText.setValue(text);
}
public MutableLiveData<String> getText() {
return selectedText;
}
}
Plik
zawierający klasę fragmentu pierwszego:
// Wewnątrz onClick w Fragment1
SharedViewModel viewModel = new ViewModelProvider(requireActivity()).get(SharedViewModel.class);
viewModel.setText(editText.getText().toString());
Plik
zawierający klasę fragmentu drugiego:
@Override
public View onCreateView(LayoutInflater inflater, ViewGroup container, Bundle savedInstanceState) {
View v
= inflater.inflate(R.layout.fragment_2, container, false);
EditText editText=v.findViewById(R.id.edit_text);
SharedViewModel
viewModel = new ViewModelProvider(requireActivity()).get(SharedViewModel.class);
viewModel.getText().observe(getViewLifecycleOwner(), text -> {
//
Tu tekst pojawi się automatycznie!
editText.setText(text);
});
return v;
}
ViewModel – obserwowanie
zmian
Wykorzystanie
metody observe() to kluczowy element programowania
reaktywnego w Androidzie. Dzięki niej Fragment2 nie musi pytać o dane –
on „nasłuchuje”, aż dane same do niego „przypłyną”.
Oto
kompletny przykład implementacji komunikacji między fragmentami.
1.
Wspólny SharedViewModel
To
jest nasz pośrednik. Kluczowe jest użycie MutableLiveData,
która pozwala na obserwowanie zmian.
Plik SharedViewModel.java:
import androidx.lifecycle.LiveData;
import androidx.lifecycle.MutableLiveData;
import androidx.lifecycle.ViewModel;
public class SharedViewModel extends ViewModel {
private final
MutableLiveData<String> message = new MutableLiveData<>();
//
Metoda do wysyłania danych
public void sendMessage(String text) {
message.setValue(text);
}
//
Metoda do nasłuchiwania (obserwowania) danych
public LiveData<String>
getMessage() {
return
message;
}
}
fragment
kodu w Fragment1:
@Override
public View onCreateView(LayoutInflater inflater, ViewGroup container,
Bundle savedInstanceState) {
View v = inflater.inflate(R.layout.fragment_1, container, false);
EditText editText = v.findViewById(R.id.edit_text);
Button buttonGo
= v.findViewById(R.id.button_go);
buttonGo.setOnClickListener(new View.OnClickListener(){
@Override
public
void onClick(View
v) {
// Łączymy się z ViewModelem
przypisanym do AKTYWNOŚCI (requireActivity)
SharedViewModel viewModel = new ViewModelProvider(requireActivity()).get(SharedViewModel.class);
// Przekazujemy tekst z EditText
viewModel.sendMessage(editText.getText().toString());
}
});
return v;
}
Fragment
kodu w Fragment2:
@Override
public View onCreateView(LayoutInflater inflater, ViewGroup container, Bundle savedInstanceState) {
View v = inflater.inflate(R.layout.fragment_2, container, false);
EditText editText = v.findViewById(R.id.edit_text);
//
Pobieramy ten sam ViewModel co w Fragment1
SharedViewModel viewModel = new ViewModelProvider(requireActivity()).get(SharedViewModel.class);
//
USTAWIANIE OBSERWATORA
viewModel.getMessage().observe(getViewLifecycleOwner(), new Observer<String>()
{
@Override
public
void onChanged(String s) {
// Ta metoda wykona się automatycznie, gdy tylko dane w ViewModelu się zmienią
editText.setText(s);
}
});
return v;
}
· Automatyzacja:
Metoda onChanged wykona się natychmiast po wywołaniu sendMessage w pierwszym fragmencie.
· Bezpieczeństwo
cyklu życia:
Dzięki getViewLifecycleOwner(), obserwator zostanie
automatycznie usunięty, gdy fragment zostanie zniszczony. To zapobiega wyciekom
pamięci i próbom aktualizacji widoku, który już nie istnieje.
· Brak
Bundle:
Nie musisz definiować kluczy ARG_PARAM1, ARG_PARAM2 ani pilnować, czy typy
danych się zgadzają.
4. Zadania
Zadanie
1.
Napisz program według własnego pomysłu,
w którym umieść dwa fragmenty obok siebie.
W pierwszym fragmencie powinny znaleźć
się formularze do wprowadzenia danych o studencie: imię, nazwisko, kierunek_studiów, rok, nazwa specjalności.
W drugim fragmencie powinny znaleźć się
pola tekstowe wyświetlające dane studenta wprowadzone w pierwszym fragmencie.
Dane powinny pojawić się w momencie naciśnięcia przycisku „Ustaw” w pierwszym
fragmencie.
Zadanie
2.
Napisz program według własnego pomysłu,
w którym wykorzystaj reaktywne programowanie do przekazywania danych miedzy
fragmentami. Fragmenty powinny być zamieniane w głównym widoku aplikacji.